

How To Use Plastic Bottles For Gardening
Regardless of how environment-savvy you are, usage of plastic bottles is hard to avoid. For instance, in the US, on a daily basis, more than sixty million plastic bottles are disposed into the streets, waterways, landfills, you name it. Only approximately 20% of these plastic bottles get recycled. This is untold injustice to the nature, isn't it? However, hope is not lost. As avid recyclers, we thrive in enhancing your satisfaction by helping you turn your household waste such as plastic bottles into something useful.

Undoubtedly, they're myriad ways you can use plastic bottles, making a plastic bottle garden is probably the most perfect of them. Creating a DIY plastic bottle garden accrues you untold garden space to grow own herbs, veggies or even flowers. That's a great idea towards using plastic bottles that have been lying around your house, right? In this read, we'll be giving you a complete DIY guide on how to make a plastic bottle garden, but first.
Define a Plastic Bottle Garden?
As the name suggests, plastic bottle garden is a built provision for growing greenery inside the plastic bottle. They're a perfect substitute garden for gardeners with limited or no outdoor space.

In addition to saving space, they allow you grow the herbs of your choice. Also, plastic bottle gardens are affordable and easy to make. What's more, they're guaranteed to accentuate your unique décor and keep the desired summer feeling even during colder seasons. Making a plastic bottle garden should definitely be your next DIY project, here's why!
Benefits of Making a Plastic Bottle Garden
- Saves a lot of space. Considering that they're normally made horizontally or vertically, they're great for those who have limited space for growing their greeneries.
- Recycling. They're a perfect way of recycling old plastic water bottles.
- It takes little time to complete.
- Allows addition. You can grow more greenery at any time by simply adding more bottles of soil.
- Minimal water. You won't require tons of water to grow a plastic bottle garden.
- Affordability. Apart from the seeds and soil, chances are you already have other required items around your house.
- Great in heat retention thus keeping your seedlings warm.
- Ability to withstand strong winds. Having being well anchored, a plastic bottle garden can't be blown away by wind.

How to Make a Plastic Bottle Garden?
There are a couple of methods you can use to make a plastic bottle garden. In this guide, we'll show you the two most popular methods, but you can always try others as you wish.
Requirements
- Plastic Bottles. We recommend that they be at least 2 liters, 3-4 bottles for each tower. The cumulative number will depend on the size of your garden.
- Tweezers/Nails/Chopsticks . These are for making the necessary holes on the plastic bottles.
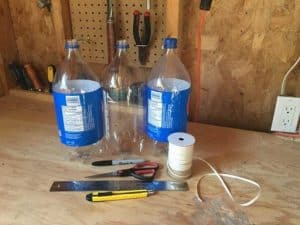
- Ruler . For any required measurements.
- Knife/Box cutter . To help cut through the plastic.
- Marker . Will help poke the plastic bottles into the specific measurements.
- Wires. To hold the bottles gardens on the support system.
- Soil. Can be either garden soil or potting soil .
- Seeds.
- Activated charcoal
- Pebbles.
After arming yourself with the above, proceed with the first method as follows. Basically, it involves use of the plastic bottles horizontally while method two entails using them vertically.
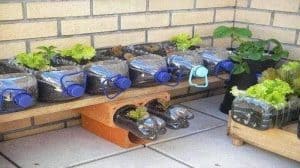
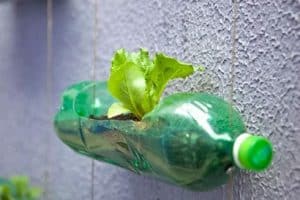
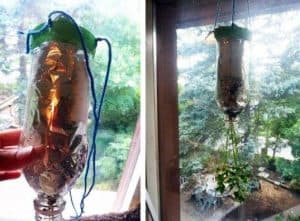
Method 1: Horizontal Plastic Bottle Garden
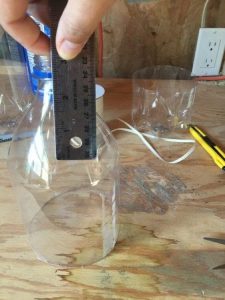
1. Prepare Your Bottle
Start by selecting a plastic bottle that's big enough for plants to grow in. The larger its opening, the easier the garden maintenance. Clean it and let it dry before use.

If the bottles have any labels, remove them. This is just meant to make the resultant plastic bottle garden better with no labels between your greens. However, you can still decide to retain them, there's no harm. Lay the bottle and while observing 5cm spacing, cut two horizontal lines on the plastic bottles and detach the cut stripes.
2. Create the Base
Fill their bottom with pebbles. These provide water to collect in after irrigation. Though optional, we highly recommend it.
3. Add a Layer of the Activated Charcoal and Peat Moss
The activated charcoal intended to reduce any smell resulting from decomposition inside the bottle. This ensures it remain clean.
The layer of peat moss on top of the charcoal helps in enhancing water and nutrients retention. This ensures the plants have all their growth requirements. This step is also optional, but we highly recommend it.
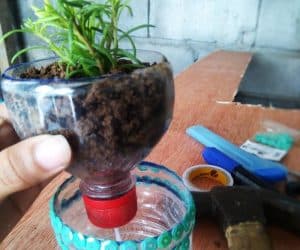
4. Plant your Plastic Bottle Garden
Grow seeds of small indoor plants into the soil using tweezers. Most suitable plants are club moss, crotons and prayer plants. They make ideal plastic bottle plants because of their suitability humid conditions.
5. Seal the garden and watch it grow
Add water and seal the bottle's lid. Place it where it can get access to the sunlight. Punch a hole in the lid to allow for moisture and air circulation.
Normally, this method doesn't have a way of draining excess water. As such, don't exceed the limit lest you overwater and suffocate your plants. We recommend that you only water the plastic bottle garden when there's no visible condensation inside.
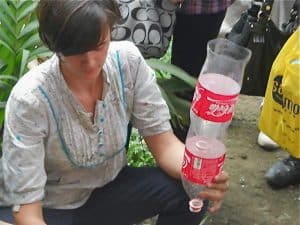
Lastly, you can decide to create a horizontal-vertical plastic bottle garden by connecting the bottles with wires and securing the gardens on the wall as shown hereunder.

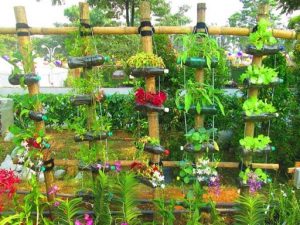
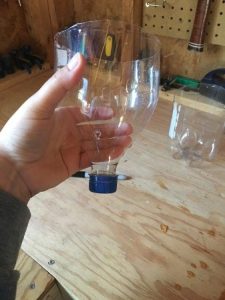
Method 2: Vertical Plastic Bottle Garden
1. Create the base

Chances are your bottles have labels, make a cut below the labels while leaving a small part of the bottom curve inwards. This helps the bottles stack with ease. Remove its base after cutting.
2. Markings
Using a marker and a ruler, measure four inches above the cap. Do the same on the other side of the bottle. Poke holes for water drainage using the tweezers
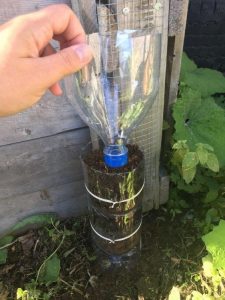
3. Add Soil
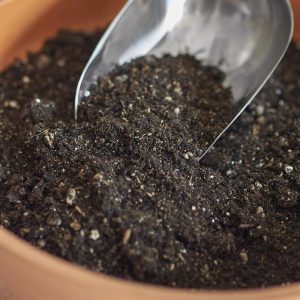
Add either potting soil or garden soil into the plastic bottles, the choice is yours. However, if you're on budget, the latter is better. Otherwise, potting mix is best especially if you intend to have indoor plastic bottle garden.
Press it gently to ensure there's no space between the layers then be keen to leave about one inch space at the top.
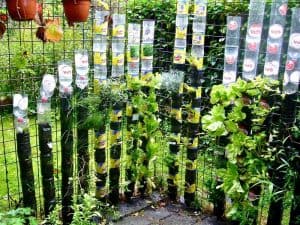
4. Construct the support structure

This is where the plastic bottle garden will be placed. You can opt for wired fence, chain-links or even wooden ones. Using the wires, tie the gardens base to that structure. Ensure it is firm enough and not wobbly, else it might fall and make a mess.
5. Recreation Levels
This involves creation of additional levels. Take another bottle and repeat step 1 and 3. While redoing step three, remember to gently press the soil and leave the above recommended space.
6. Add soil and tie
Depending on your intended vertical height, repeat the above steps. Add the soil in the advised manner while being keen to remove the bottle cap after every addition. Also, tie the plastic bottles to ensure there are no loose ends.
For a start, you can consider tying together 3-5 bottles to create one vertical plastic bottle garden. Still, you can add other parallel gardens. You just have to repeat the above steps to create the size of garden you desire.
7. Create an irrigation system
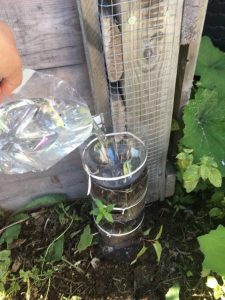
Obviously, you want to have your plants adequately watered, right! For this, get extra plastic bottles. Cut them into half.
This serves as the watering funnels. Evidently, they're shorter than the rest. Poke a small hole on the cap of the watering bottle.
8. Attachments
Attach the funnel bottle caps and poke two holes its sides. Place the funnel to the rest of the plastic bottle garden and ensure there is firm contact with the soil on the supporting bottle beneath.
9. Place the watering bottle
This is the one you poked hole on the cap. The resultant order from top to bottom should be the watering bottle, funnel, bottle gardens, and the base. For extra stability, you can tie them as you did with the soil bottles.
10. Plant your seeds
The last phase of this fantastic DIY vertical plastic bottle garden involves planting your seeds/seedlings. Cut small squares into the plastic bottles with each being 2 inches maximum.
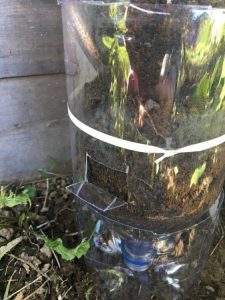
Leave the bottom side uncut. Using your finger, poke a hole into the soil through the resultant small flap and place the seeds/seedlings of your choice into the small hole.
11. Watering
Fill the top-most bottle with clean water and continue refilling after every few days. Wait and enjoy watching your plastic bottle garden thrive. Within no time, it will be the source of fresh produce in your home. Thank us later!
Wrapping it up…
Did you envision plastic bottle gardens to be this much fun? If you're passionate about growing your own garden yet face space limitations, this DIY plastic bottle garden is the way to go. What's more, you can make your plastic bottle garden in varied shapes and sizes, your imagination is your only limitation. BTW, don't let the many steps explained above fool you, creating your own is very easy and can be done within a few hours.
Which of the above 'how to' do you intend to try? We'll be glad to read your experience in the comments section below.
How To Use Plastic Bottles For Gardening
Source: https://www.igra-world.com/plastic-bottle-garden/
Posted by: stewartasher1959.blogspot.com
0 Response to "How To Use Plastic Bottles For Gardening"
Post a Comment